


We love being able to both Support and offer WordPress and Managed WordPress hosting to our customers. WordPress and our WordPress Complete Security Solution is one of the many great products we have available.
Although WordPress is one of the most commonly used CMS, it is unfortunately not impervious to error. In this Article we will discuss the most common troubleshooting techniques for WordPrefss which help solve the most common errors and issues regarding WordPress.
In most cases the most effective Troubleshooting method is the “Rule Out” method.
We recommend using this information as a general guide but remember, you can always reach out to us if you need assistance with WordPress!
Overview:
- Don’t Panic! Most WordPress Errors are Easy to Fix
Enable WordPress Debugging Mode
WordPress Debugging Mode is helpful because it allows errors to display on your WordPress website which otherwise aren’t seen. Displaying errors can help you in your troubleshooting when you are experiencing an issue but aren’t sure where to start.
→ Click Here to View our Guide: How to Enable WordPress Debug Mode
Note! It is not recommended to enable WordPress Debugging Mode on a live Production Site as the Errors will be visible to anyone who browses to your Website. Instead you can Clone Your WordPress website and Enable Debug Mode on your Development Site.
Or alternatively, you can enable the debug.log instead.
Restore “.htaccess” to the Default .htaccess for WordPress
The .htaccess file in WordPress can sometimes be modified by Themes or Plugins and cause undesired effects in your WordPress website. This can be easily resolved by replacing the ‘.htaccess’ file with the default ‘.htaccess’ file for WordPress. The changes can be easily reverted if you find .htaccess wasn’t the issue. We will explain how to do so step-by-step below.
How to Replace .htaccess with the Default .htaccess for WordPress
→ Take me to the .htaccess code!
Step 1. Log into cPanel
Step 2. Click on ‘File Manager‘
Note! The .htaccess file is a (DOT) file and is hidden by Default in File Manager. You will need to take steps to Show Hidden (DOT) files in File Manager to see the .htaccess file.
Step 3. Navigate into the Document Root for your WordPress Website.
Note! ‘public_html‘ is the Document Root for your Primary Domain.
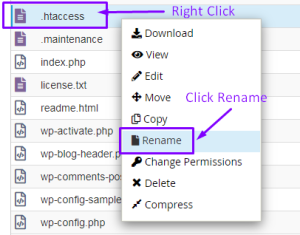
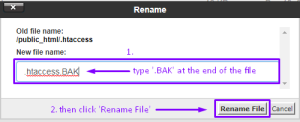
Before making changes we need to make a copy of your ‘.htaccess’ file. To do so we will rename your current .htaccess file to ‘.htaccess.BAK‘ then create a new fresh “.htaccess” file where we will save our new changes.
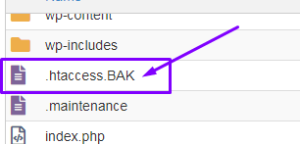
Step 4. Right-Click on ‘.htaccess‘ then select ‘Rename‘. Rename the file to ‘.htaccess.BAK‘ then click ‘Save‘.
Note! This makes a copy of the file before any changes were made so that the changes can be easily reverted later if necessary.
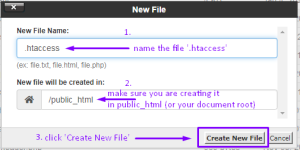
Step 5. Create a New File by Clicking on the New File icon in the Top Left Hand Corner of File Manager

Step 6. Name the new file ‘.htaccess‘ then click ‘Create New File‘.
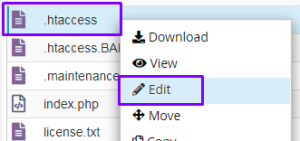
Step 7. Right-Click on the new ‘.htaccess’ file we’ve just created and click ‘Edit‘
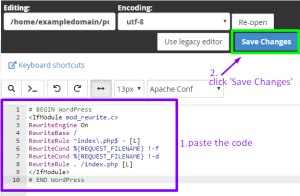
Step 8. Paste the following code into the ‘.htaccess‘ file:
# BEGIN WordPress
RewriteEngine On
RewriteBase /
RewriteRule ^index\.php$ - [L]
RewriteCond %{REQUEST_FILENAME} !-f
RewriteCond %{REQUEST_FILENAME} !-d
RewriteRule . /index.php [L]
# END WordPress
Step 9. Click ‘Save Changes‘ to save the file.
That’s it! You’ve replaced the .htaccess file with the default .htaccess file that comes with WordPress.
If the issue you were experiencing still persists then you have ruled out ‘.htaccess’ as the culprit.
Once you are done with your troubleshooting you can reverse the chances by deleting .htaccess and renaming the ‘.htaccess.BAK’ file to ‘.htaccess’ once more.
When to Disable Plugins and Custom Themes
WordPress plugins can add more functionality to your WordPress site thus making it much more robust and suitable for your specific needs. But it is important to remember that not all plugins come from the makers of WordPress.org and instead are built by third-party developers.
With that in mind and the amount of free and premium plugins available it is near impossible to cross check compatibility with every plugin.
There is no guarantee that any specific combination of plugins will not conflict with each other – and it’s bound to happen eventually. It can be useful knowing when to troubleshoot Plugins and Themes in WordPress when you are experiencing an issue.
Reasons to Disable Plugins in WordPress for Troubleshooting:
It can also be useful to switch your theme back to a Default WordPress theme such as Twenty-Seventeen to see if the error resolves itself.
What to do when Disabling the Theme or Plugin Resolves the Error
If disabling a specific Plugin or Switching your theme resolves the issue, it’s time to reach out to the Plugin or Theme Developer to see what they can advise.
You’ll want to let them know the exact error or issue you are experiencing as well as the combination of Plugins and the name of the Theme you are using to help them pin point an issue.
They will most likely be grateful for the information and it can help them to improve the stability and compatibility of their Plugin/Theme and many plugin developers are happy to offer support.
GlowFrog customers enjoy concierge, expert help with most plugin and theme issues. Sign up for one of our Managed WordPress plans and enjoy a free, fast migration within 24 hours.
Common Errors in WordPress
404 Error – File Not Found
404 errors can be frustrating and are never good. 404 errors are bad for your SEO (search engine optimization) and can give a bad impression on potential users of your website.
If you are experiencing a 404 error in your website during the time search engines are crawling your site it can result in lowering your page rankings.
Luckily, these are generally easy to fix if no files have actually been removed.
WordPress Permalink Settings: Solving 404 Errors
WordPress has a setting which allows you to effectively rewrite URL’s for your Posts and Pages which make them more pleasant for the reader and easier for search engines to index.
- Regular permalink:
https://exampledomain.com/?p=134
- Pretty Permalink:
https://exampledomain.com/how-to-fix-404-errors/
If you notice a soft 404 error on a page you know exists, (a hard 404 error happens when the resource you are looking for does not actually exist on the server) it’s time to Reset Permalinks in WordPress.
→ View Our Guide on How to Reset Permalinks in WordPress
Understanding the Difference between Soft 404 and Hard 404 Errors
If you are receiving a Soft 404 Error in WordPress, Resetting the Permalink Settings in WordPress will generally resolve this issue.
To understand why, it is important to recognize the distinction between a “Soft 404 Error” and a “Hard 404 Error”.
We’ve provided a brief explanation of the difference between a Soft 404 Error and Hard 404 Error for you below.
→ View Our Guide on How to Reset Permalinks in WordPress
Hard 404 Error
404 errors happen when a File Server cannot find the file specified. It is a message generated by the server to let the end user know that the file requested could not be found because it does not exist. This is an example of a “Hard 404 Error”.
Soft 404 Error
WordPress has it’s own version of a 404 Error. The WordPress version of a 404 error is a bit different. WordPress is a PHP application which generates “pretty links” for your pages such as “mywebsite.com/pretty-link”. When you search for something in your WordPress website or mistype a URL, WordPress will return a “Soft 404 Error”.
This error is not generated by the server and instead is generated by WordPress letting you know that yes something exists here – but not the thing you were looking for.
If you are getting a “Soft 404 Error” this is likely due to your Permalink settings in WordPress and can be easily addressed. Resetting Permalinks in WordPress will generally solve the Soft 404 Error you are receiving.
→ View Our Guide on How to Reset Permalinks in WordPress
Memory Exhausted Errors
“fatal error: allowed memory size of 67108864 bytes exhausted”
This error generally results when there isn’t enough PHP memory allocated for your WordPress website.
Not all PHP based applications are created equal, thus some require different PHP settings.
PHP memory is a setting that is controlled by the server and depends on your plan. Some sites may need more PHP memory than others, based on the plugins and themes it is using in to run optimally.
As a security precaution, memory limits in PHP are set to the lowest possible setting in order to prevent the abuse of resources on the server by malicious activity.
It is generally okay to increase this limit within a reasonable amount. Please reach out to us if you think you need more PHP memory or are getting these errors in your site.
Fatal error: Allowed memory size of 33554432 bytes exhausted (tried to allocate 2348617 bytes) in /home4/xxx/public_html/wp-includes/plugin.php on line xxx
Increase PHP Memory Limit for your WordPress Site
There should be a ‘php.ini‘ file in the document root for your WordPress site which controls this setting. In the past you would need to make manual edits to the file in order to increase your PHP memory limit.
We’ve made it simpler for you to make changes to your PHP settings for your WordPress site from within your cPanel account.
To increase your PHP memory limit in cPanel, follow the steps below.
Step 1. Log into cPanel
Step 2. In the Search Box, start typing ‘MultiPHP INI Editor‘. The icons should change and you should already see the ‘MultiPHP INI Editor‘ icon within typing the first word.
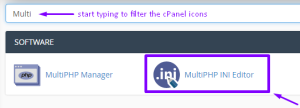
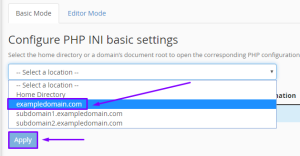
Step 3. Click on the ‘Multi PHP INI Editor‘ icon
Step 4. Under the Basic Mode tab click on the drop-down button to Select your domain from the List then Click ‘Apply‘.
Step 5. Locate the ‘Memory_Limit‘ directive and increase the value. 256M is generally a good enough amount of memory to allocate. If your setting was already at 256M you can increase it to 512M.

Step 6. Scroll down to the bottom of the page then click ‘Apply‘.
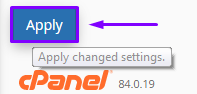
You should see a green Success! message at the top right-hand corner of the page indicating the changes were applied successfully.

That’s it! You’ve successfully increased the PHP memory limit for your WordPress website. Refresh the page to ensure the error message is gone.
Corrupted Database Issue
WordPress is a PHP application that relies heavily on a database to store Posts, Pages, Settings and just about everything else related to the content in your WordPress site. PHP applications write to the database frequently.
Sometimes, something can go wrong during the interaction resulting in database corruption. It is not only difficult to pin-point an exact cause for database corruption – but it is also generally unnecessary as there usually isn’t a need to pin-point the cause of the corruption in order to resolve the database corruption.
Database corruption generally occurs as a result of PHP applications and Databases interacting then something goes wrong during the interaction. There generally isn’t any one step you could have taken to avoid it.
Thus performing deep forensic analysis and trying to pin-point the source of the database corruption is not only a frivolous pursuit – but a waste of time.
Thankfully, repairing the database is usually easy and takes only a few minutes depending on the size of the database. Unless the database corruption is occurring on a regular basis, you can repair your database and rest easy.
→ View our Guide: How to Check and Repair a Corrupted Database in cPanel
Don’t panic! Most WordPress Errors are easy to Fix.
Most errors in WordPress are easy to fix. Don’t panic! If you need help reach out to our Support. We are more than happy to help. Our Support is second to none and will go out of our way to make sure you are taken care of.
Not a current GlowFrog customer? Sign up for one of our Managed WordPress plans and enjoy a free, fast migration within 24 hours.
")