If you have checked using an online tool such as: https://www.whatsmydns.net/ and can see the DNS is updated but are still not able to load the site on your end you may need to clear or Flush your DNS cache. In this guide, we will go over how to flush DNS cache on your Windows, MAC or Chrome device.
In this Guide:
→ What is DNS Cache?
→ What Does Flushing your DNS Cache Do?
→ Flush DNS Cache on Windows
→ Flush DNS Cache on MAC
→ Flush DNS Cache on Chrome
→ Flush DNS Cache on Linux
In Another Guide:
→ How to Clear your Browser Cache
What is DNS Cache?
The internet is basically a big phonebook of domain names (example.com) and IP Addresses (192.168.0.1). Each time you look for a website in your internet browser, your computer has to perform a “DNS lookup” to figure out where the site for the domain lives.
Doing this “DNS Lookup” every time can cause some latency or delays while browsing for sites but this is where DNS Cache comes in. DNS Cache is a collection of previous lookups stored in temporary storage to help speed up the time it takes for your computer to resolve or locate a website address.
Your computer stores this for a short period of time (typically 24 hours) to help improve your browsing experience. If an IP address for a site has recently changed your computer might still be looking for the old IP due to DNS cache. In those cases, you’ll want to Clear or Flush your DNS cache.
What does Flushing your DNS Cache Do?
Flushing your DNS cache is safe to do. It clears the temporary storage of DNS cache that your computer has collected from previous DNS lookups so that the next time you attempt to browse a site a new lookup will be performed, retrieving updated DNS information instead of the old, cached DNS information.
Flush DNS Cache on Windows
→ Windows 10
→ Windows 8 / Windows 8.1
→ Windows Vista / Windows 7
→ Windows 98/NT/2000/XP
Flush DNS Cache on Windows 10
1. Make sure that you are starting from the Windows desktop.
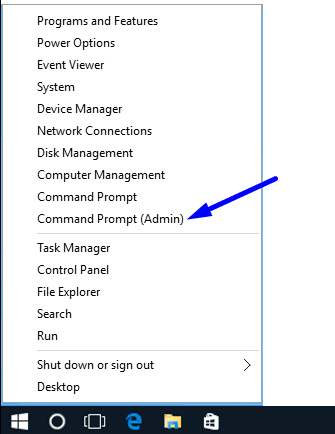
2. Right click on the start menu and choose Command Prompt (Admin) from the menu.
3. In the black box, type in the command ipconfig /flushdns
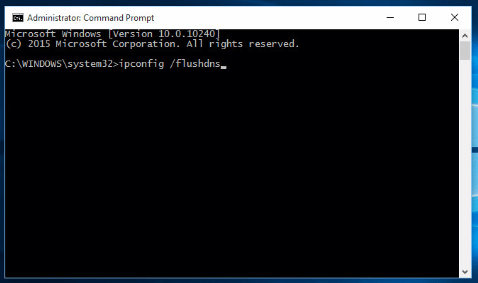
4. Press Enter
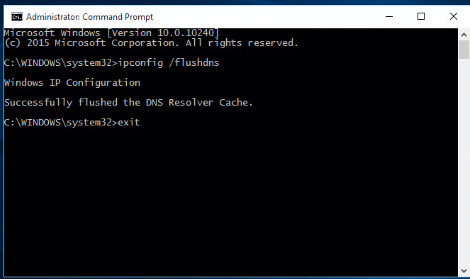
Windows IP Configuration
Successfully flushed the DNS Resolver Cache.
That’s it! From here it’s probably best to also Clear your Browser Cache, then go ahead and try to open a new browsing session and visit the site address you want to visit once more.
Flush DNS Cache on Windows 8 / 8.1
1. Make sure that you are starting from the Windows desktop.
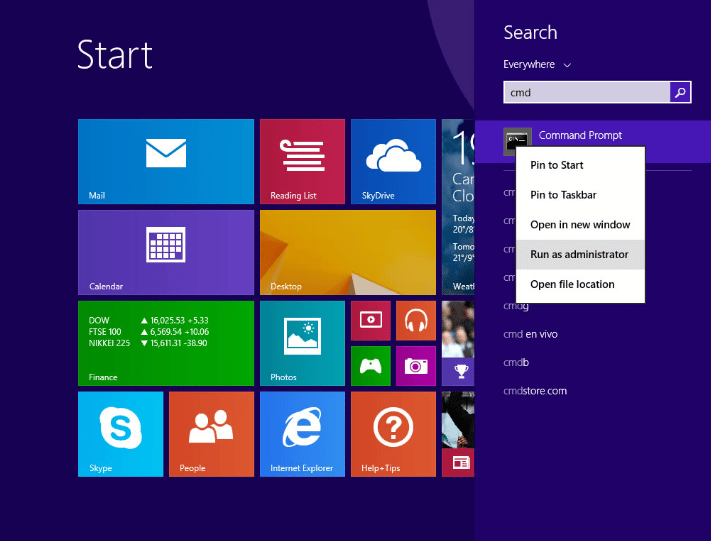
2. Open the Start Menu and type cmd and the Windows search bar will appear on the right-hand side with search results.

3. Right click on Command Prompt and click Run as administrator
4. In the Black Box type in the command ipconfig /flushdns
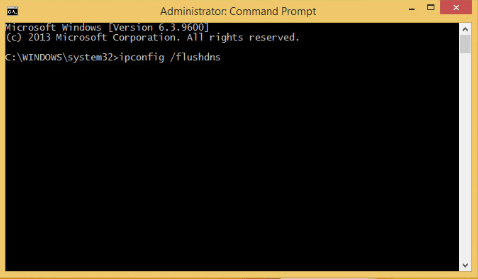

Windows IP Configuration
Successfully flushed the DNS Resolver Cache.
That’s it! From here it’s probably best to also Clear your Browser Cache, then go ahead and try to open a new browsing session and visit the site address you want to visit once more.
Flush DNS Cache on Windows Windows Vista / Windows 7
1. Click the start button and navigate to the command prompt (Start > All Programs > Accessories > Command Prompt)
Note: You can also use the Windows Vista / Windows 7 start menu search and type in cmd. From there you can right click on the
cmd.exeand select ‘Run as Administrator’. This options saves steps because it avoids having to go through multiple menus.
2. Make sure that you right click on the command prompt application and choose ‘Run as Administrator’
3. Type in the following command: ipconfig /flushdns
Flush DNS Cache on MAC
→ What Version of MAC am I using?
→ Mac OS 12 – Monterey
→ Mac OS 11 – Big Sur
→ Mac OS 10.15 – Catalina
→ Mac OS 10.14 – Mojave
→ Mac OS 10.13 – High Sierra
→ Mac OS 10.12 – Sierra
→ Mac OS X 10.11 – El Capitan
→ Mac OS X 10.10 – Yosemite
→ Mac OS X 10.9 – Mavericks
→ Mac OS X 10.8 – Mountain Lion
→ Mac OS X 10.7 – Lion
→ Mac OS X 10.6 – Snow Leopard
→ Mac OS X 10.5.1 – Leopard and below
How to Check What Version of MAC you are Using
Flushing the DNS in Mac OS and Mac OS X is easy process but you’ll need to know what version of MAC you are running because the steps are different depending on the version. Below are the steps you can take to identify which version of MAC you’re using:
Step 1. Click the Apple icon at the top left of your screen.
Step 2. Select “About This Mac”.
Step 3. Look at the name and version of Mac OS you are running and proceed to the section for your version below.
Note: You will need administrator permissions before you can flush the DNS cache on Mac. You’ll need to do so by either running the commands as the root user OR using sudo before each command and entering your MAC account password.
Mac OS 12 – Monterey
If you are running Mac OS 12 follow the steps below to Flush your DNS Cache:
1. Open Finder and navigate to the Applications > Utilities directory and open the Terminal app.
2. Type in the command sudo killall -HUP mDNSResponder.
3. Enter the password you use to login to your MAC computer at the prompt. You will not see a cursor, this is normal. Just type the password and then press return.
Mac OS 11 – Big Sur
If you are running Mac OS 11, follow the steps below to Flush your DNS Cache:
1. Open Finder and navigate to the Applications > Utilities directory and open the Terminal app.
2. Type in the command sudo killall -HUP mDNSResponder.
3. Enter the password you use to login to your MAC computer at the prompt. You will not see a cursor, this is normal. Just type the password and then press return.
Mac OS 10.15 – Catalina
If you are running Mac OS 10.15, follow the steps below to Flush your DNS Cache:
1. Open Finder and navigate to the Applications > Utilities directory and open the Terminal app.
2. Type in the command sudo killall -HUP mDNSResponder.
3. Enter the password you use to login to your MAC computer at the prompt. You will not see a cursor, this is normal. Just type the password and then press return.
Mac OS 10.14 – Mojave
If you are running Mac OS 10.14, follow the steps below to Flush your DNS Cache:
1. Open Finder and navigate to the Applications > Utilities directory and open the Terminal app.
2. Type in the command sudo killall -HUP mDNSResponder.
3. Enter the password you use to login to your MAC computer at the prompt. You will not see a cursor, this is normal. Just type the password and then press return.
Mac OS 10.13 – High Sierra
If you are running Mac OS 10.13, follow the steps below to Flush your DNS Cache:
1. Open Finder and navigate to the Applications > Utilities directory and open the Terminal app.
2. Type in the command sudo killall -HUP mDNSResponder.
3. Enter the password you use to login to your MAC computer at the prompt. You will not see a cursor, this is normal. Just type the password and then press return.
Mac OS 10.12 – Sierra
If you are running Mac OS 10.12, follow the steps below to Flush your DNS Cache:
1. Open Finder and navigate to the Applications > Utilities directory and open the Terminal app.
2. Type in the command sudo killall -HUP mDNSResponder.
3. Enter the password you use to login to your MAC computer at the prompt. You will not see a cursor, this is normal. Just type the password and then press return.
Mac OS X 10.11 – El Capitan
If you are running Mac OS X 10.11, follow the steps below to Flush your DNS Cache:
1. Open Finder and navigate to the Applications > Utilities directory and open the Terminal app.
2. Type in the command sudo killall -HUP mDNSResponder.
3. Enter the password you use to login to your MAC computer at the prompt. You will not see a cursor, this is normal. Just type the password and then press return.
Mac OS X 10.10 – Yosemite
If you are running Mac OS X 10.10, follow the steps below to Flush your DNS Cache:
1. Open Finder and navigate to the Applications > Utilities directory and open the Terminal app.
2. Type in the command sudo discoveryutil udnsflushcaches.
3. Enter the password you use to login to your MAC computer at the prompt. You will not see a cursor, this is normal. Just type the password and then press return.
Mac OS X 10.9 – Mavericks
If you are running Mac OS X 10.9, follow the steps below to Flush your DNS Cache:
1. Open Finder and navigate to the Applications > Utilities directory and open the Terminal app.
2. Type in the command sudo killall -HUP mDNSResponder.
3. Enter the password you use to login to your MAC computer at the prompt. You will not see a cursor, this is normal. Just type the password and then press return.
Mac OS X 10.8 – Mountain Lion
If you are running Mac OS X 10.8, follow the steps below to Flush your DNS Cache:
1. Open Finder and navigate to the Applications > Utilities directory and open the Terminal app.
2. Type in the command sudo killall -HUP mDNSResponder.
3. Enter the password you use to login to your MAC computer at the prompt. You will not see a cursor, this is normal. Just type the password and then press return.
Mac OS X 10.7 – Lion
If you are running Mac OS X 10.7, follow the steps below to Flush your DNS Cache:
1. Open Finder and navigate to the Applications > Utilities directory and open the Terminal app.
2. Type in the command sudo killall -HUP mDNSResponder.
3. Enter the password you use to login to your MAC computer at the prompt. You will not see a cursor, this is normal. Just type the password and then press return.
Mac OS X 10.6 – Snow Leopard
If you are running Mac OS X 10.6, follow the steps below to Flush your DNS Cache:
1. Open Finder and navigate to the Applications > Utilities directory and open the Terminal app.
2. Type in the command sudo dscacheutil -flushcache.
3. Enter the password you use to login to your MAC computer at the prompt. You will not see a cursor, this is normal. Just type the password and then press return.
Mac OS X 10.5.1 – Leopard and below
If you are running Mac OS X 10.5.1 or below, follow the steps below to Flush your DNS Cache:
1. Open Finder and navigate to the Applications > Utilities directory and open the Terminal app.
2. Type in the command sudo lookupd -flushcache.
3. Enter the password you use to login to your MAC computer at the prompt. You will not see a cursor, this is normal. Just type the password and then press return.
Flush DNS Cache on Chrome
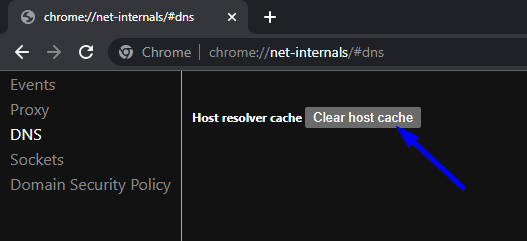
Sometimes, you need to clear your Browsers DNS cache instead of your Operating Systems (OS). In Google Chrome, you can do so by opening up a new browsing session in Chrome and entering the following into the Address Bar (make sure it’s the address bar at the top and NOT a search engine like Google.com):
chrome://net-internals/#dns
Next, click on the Clear host cache button:
Flush DNS Cache on Linux
Flushing the DNS Cache on Linux systems is a very similar process to doing so on MAC or Windows OS. Select your Distribution below to learn how.
→ Flush DNS Cache on Ubuntu
→ Flush DNS Cache on other Linux Distributions
Flush DNS Cache on Ubuntu
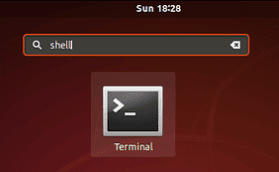
1. Open the Terminal. You can do this by clicking on Activities at the top left of the screen, type the first few letters of “terminal”, “command”, “prompt” or “shell”.
2. Type the command: sudo systemd-resolve --flush-caches and then press enter.
That’s it! Your DNS Cache should be clear.
Flush DNS Cache on other Linux Distributions
If you are using another Linux Distrubution other than Ubuntu, you can generally flush your DNS cache with the following command:
sudo /etc/init.d/dns-clean start
Once you’ve flushed your DNS cache, depending on your OS, it’s probably best to also Clear your Browser Cache, with the time range set to ‘All Time’ and then go ahead and try to open a new browsing session and visit the site address you want to visit once more.
Not a current GlowFrog customer? Sign up for one of our Managed WordPress plans and enjoy a free, fast migration within 24 hours.




Leave a Reply