You may be wondering, how can I preview my site if my domain is not live? When a domain is NOT live, it means the DNS is not active or the domain is not registered.
It is possible to setup your own site using a temporary domain or a domain that isn’t real or isn’t yet pointed to your hosting account. Developers commonly do this in order to perform dev work before publishing a site or to check how a site is displaying after a migration.
So, how do you preview your WordPress site?
In this guide, we will go over the ways you can preview your site when it’s not live or if your domain is not registered or does not have any DNS.
→ Find Your Sites IP Address
→ Option 1: Use an Online Tool (Beginners)
→ Option 2: Use a Host File Modification
Option 1: Use an Online Tool (Beginners)
You can use an online tool like https://www.skipdns.link/, to preview your site before it’s live. Here’s how:
Step 1. Locate your Sites IP Address
Step 2. Visit: https://www.skipdns.link/ in your browser
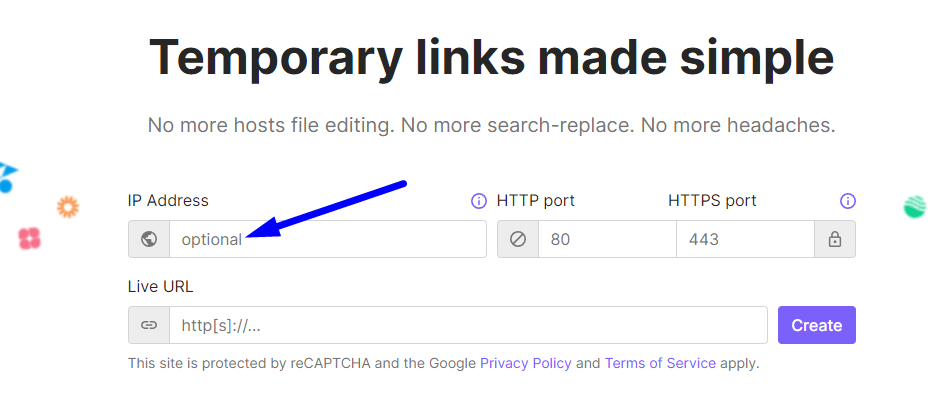
Step 3. Enter Your Sites IP Address in the IP address Field: 
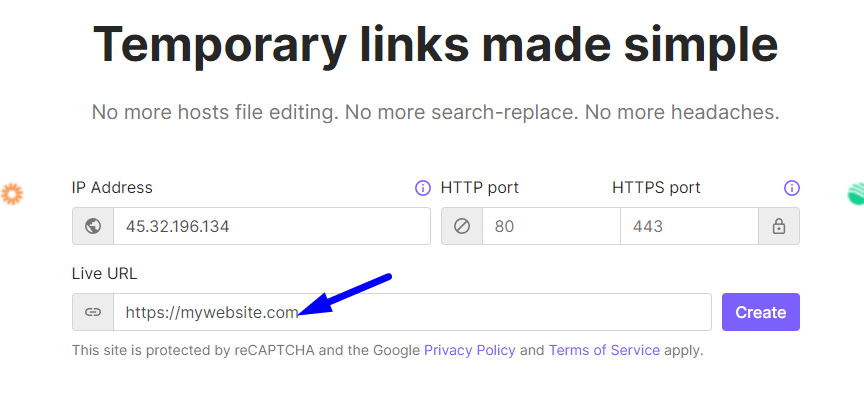
Step 3. Enter your websites full URL including ‘https://’, example: https://mywebsite.com/, in the Live URL Field:

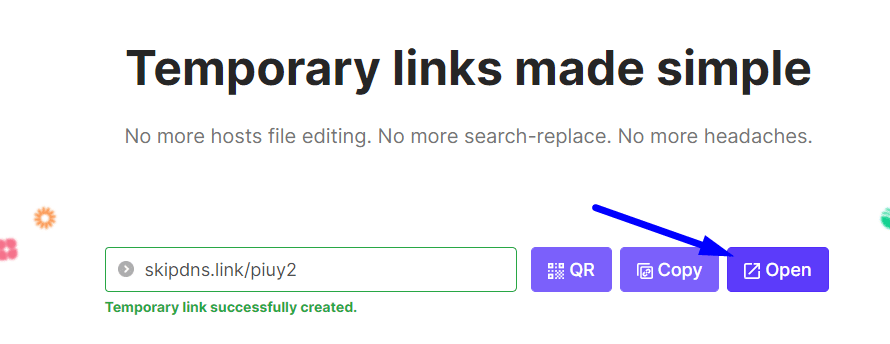
Step 4. Click, ‘Create‘

Step 5. Click, ‘Open‘

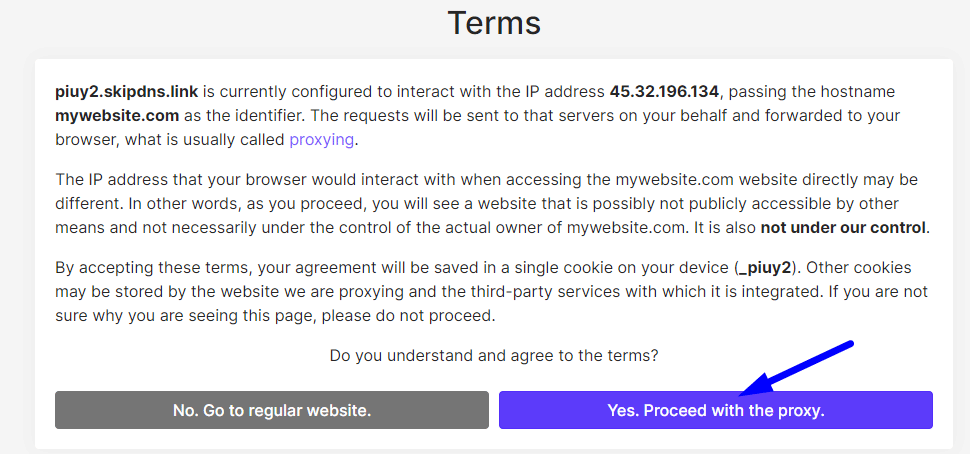
Step 6. Click, ‘Yes, Proceed with the Proxy‘

That’s it! From here you should be taken to your live site preview. The generated link will expire after some time, so this is not the best method to use for development. But it is a fast, safe method you can use for previewing your site after a migration.
Option 2: Host File Modification
On your computer there is a file known as the hosts file which stores local DNS information. This file can be safely modified to preview your website before it is live. The hosts file tells your computers browser to look for your site in a different location than what the public DNS lookup indicates. Whether you are a MAC or Windows user will determine which steps to take.
→ Host File Modification on Windows
→ Host File Modification on Mac
How to Perform a Host File Modification on Windows
If you want a quick and easy way to edit your hosts file without manual steps, you can use a free tool like: https://hostsfileeditor.com/. Otherwise, follow the steps below.
1. Press the Windows key.
2. Type Notepad in the search field.
3. In the search results, right-click Notepad and select Run as administrator.
4. From Notepad, open the following file: c:\Windows\System32\Drivers\etc\hosts.
5. With the file open, enter your Sites IP address and domain name on one line, like in the following example:
45.32.196.134       mydomain.com

45.32.196.134       www.mydomain.com
For the best results, enter your domain WITH and WITHOUT the www in front, on two lines.
6. Save the file.
7. Open up a new browser window and type your domain in the address bar.
That’s it! You should be taken to your website preview. If you see a security warning, do not worry, that is normal. It is because the FreeSSL is not yet present on your domain because it is not pointed anywhere. You can bypass this warning in your browser safely in order to view the site.
To proceed and bypass the security warning, simply choose the “Advanced” link, then choose “Proceed to yourwebsite.com (unsafe)“.
How to Perform a Host File Modification on MAC
1. Open the Terminal application. You may either type Terminal in the Spotlight search or by navigating to Applications , then the Utilities folder, then click on the Terminal app.
2. Paste the following command into your terminal window to open your hosts file for editing:
sudo nano /private/etc/hosts
or on newer MacOS:
sudo nano /etc/hosts
3. You will be asked for a password.
This is your MAC’s password that you use for logging into your MAC computer. Enter your Mac user’s password and press enter. (You will not see the cursor move, this is normal, just enter the password and press Return.)
4. Using your arrow keys on your computer to navigate and your return key to make a new line, type your IP address and domain name like in the following example:
45.32.196.134       mydomain.com

45.32.196.134       www.mydomain.com
5. To save the changes, press control-o on your keyboard, then press return to accept the filename.
6. Press control-x to exit the editor which will take you back to the main terminal window.
You may need to flush your Mac’s DNS cache for the changes to take effect. To do so, follow these steps in your terminal window:
7. Paste the command into your terminal window and press return to clear your DNS cache:
sudo dscacheutil -flushcache
That’s it! Open a new browsing session and type in your domain name to preview your website.
Not a current GlowFrog customer? Sign up for one of our Managed WordPress plans and enjoy a free, fast migration within 24 hours.


Leave a Reply