


There are more than a few ways you can install WordPress onto your domain. But, there are some instances where you may need, or want to install WordPress Manually. Click here to Scroll ahead to the steps.
At GlowFrog you can install WordPress in 1 click — without the need to install WordPress manually!
Most Hosts provide an easy way to install WordPress such as an Applications Installer, which will allow you to install WordPress easily with little to no technical configuration.
In this article we discuss how to install WordPress manually using File Manager in cPanel.
In this Guide:
→ Downloading & Uploading WordPress
→ Setting Up the Database
→ Installing WordPress
→ How to Login to WordPress
In Another Guide:
→ How to Login to WordPress
→ How to Login to WordPress in 1 Click from your GlowFrog Dashboard
→ How to Install WordPress in 1 Click from your GlowFrog Dashboard
→ How to Reset WordPress Username and Password
How to Install WordPress Manually
Downloading and Uploading WordPress
1) Download the Latest Version of WordPress from the WordPress.org website. Click Here to Visit WordPress.org and Download the Latest Version of WordPress.
2) Upload the .ZIP (example: wordpress-5.3.2.zip) file to the document root for your domain using File Manager or via FTP.
Need Help Uploading Files?
→ Click Here for Help uploading Files via File Manager
3) Extract the Contents of the file in the Document Root for your Domain.
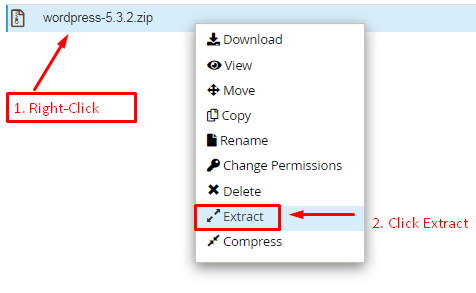
Note: When you extract WordPress, the contents will be in a folder labeled WordPress. You will need to move these files out of the WordPress folder and into the Document Root for your domain.
Need Help Moving Files?
→ Click Here for Help Moving Files in File Manager
Setting up Your WordPress Database
1) Create your WordPress Database and Database User in cPanel.
Add the User to the Database with full Administrator Privileges.
Note: Remember your Database Name, Database Username and Password. You will need this information to connect WordPress to the Database.
Need Help Creating your Database?
→ Click Here for Help Creating your WordPress Database
Installing WordPress
1) Browse to your Domain in your Internet Browser (example: https://mywebsite.com)

You should be redirected to the WordPress installation screen automatically.
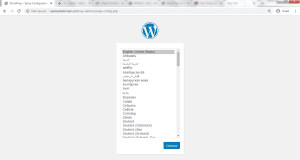
2) Select Your WordPress Language. Then click ‘Continue‘.
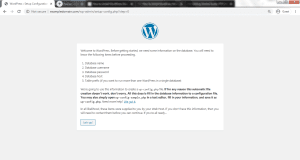
3) Click ‘Let’s Go‘ on the next page.
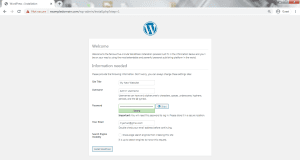
4) Enter the Database Information you saved from earlier in Step 1 of Setting up Your WordPress Database.
Confirm that the details look correct then click ‘Submit‘.

| Field | Explanation | |
|---|---|---|
| Database Name: | exampledomain_newdatabase | the name of the database (see Step 1 of Setting up Your WordPress Database) |
| Username: | exampledomain_user | the database username (see Step 1 of Setting up Your WordPress Database) |
| Password: | ************** | the database password created in an earlier step (see Step 1 of Setting up Your WordPress Database) |
| Database Host: | localhost | the location of the database (you can general leave this as localhost) |
| Table Prefix: | wp_ | the prefix of the tables within the database. wp_ is the default |
5) In the next page you should be asked to input the details for your WordPress site. Input the desired details then click ‘Install WordPress‘.
| Field | Explanation | |
|---|---|---|
| Site Title: | My New Website! | Enter the desired Title for your Website. (this can be changed later in the WordPress Dashboard) |
| Username: | Admin Username | Choose a username to login to the Administration Dashboard of WordPress |
| Password: | ************** | Set a password for the admin user |
| Your Email: | [email protected] | The email of the Administrator for WordPress. It is best to use a Gmail, Yahoo or other email address. |
| Search Engine Visibility: | Yes | Decide whether or not you want your WordPress website to show up in search engines like Google.com |
6) You should be redirected to a Success Page informing you that the installation was successful and WordPress is now installed.
Login to Your New WordPress Site
1) Click on the ‘Login‘ button to be redirected to the WordPress login page. Login with your New Username and Password to access the WordPress Dashboard.
→ See our Guide on How to Login to WordPress.
That’s it! You’ve successfully completed a Manual Installation of WordPress.
At GlowFrog you can install WordPress in 1 click — without the need to install WordPress manually!
Not a current GlowFrog customer? Sign up for one of our Managed WordPress plans and enjoy a free, fast migration within 24 hours.
")